Tampilkan postingan dengan label jailbreak. Tampilkan semua postingan
Selasa, 27 Desember 2011

How to Perform an Untethered Jailbreak of Your iPhone 4 (Mac) [5.0.1]

These are instructions on how to perform an untethered jailbreak of your iPhone 4 on 5.0.1 using RedSn0w for Mac.

This procedure will cause you to upgrade your baseband potentially ruining your chances for an unlock. Please follow a tutorial on how to update to iOS 5.0.1 using a custom ipsw if you need an unlock.


Step One
Create a folder on your desktop called Pwnage

Download the latest RedSn0w from here and place it in the Pwnage folder. Likewise, download the 5.0.1 firmware from here and place it in the Pwnage folder. (Note: you do not need to download the 5.0.1 firmware if you are already on iOS 5.0.1)

Extract the RedSn0w zip file by double clicking it.

 
Step Two: (You can skip this step if iOS 5.0.1 is already installed on your device)
Connect your iPhone to the computer and launch iTunes. 


Select your iPhone from the list of devices on the left. Now hold down Option and click the Restore button. Restore is preferred as it won't create any wasted space on your iPhone.


 Navigate to the Pwnage folder on your desktop and select the 5.0.1 firmware ipsw. Click the Choose button to continue. 
 iTunes will now update your iPhone to the new firmware.

Step Three
Launch the redsn0w application from the redsn0w folder we extracted earlier.

Step Four
Once RedSn0w opens click the Jailbreak button


Step Five
Plug your iPhone into the computer and make sure its OFF then click the Next button

Step Six
RedSn0w will now guide you through the steps to get into DFU mode.

Hold down both the Home button and the Power button for 10 seconds.
Release the Power button and continue holding the Home button until RedSn0w detects the device.

Step Seven
Your iPhone will now reboot


 Step Eight
RedSn0w will now prepare the jailbreak data.

Step Nine
Select Cydia from the list of options and click Next.

Step Ten
Your iPhone will now be rebooted again and RedSn0w will begin uploading the new RAM Disk and Kernel.


Step Eleven
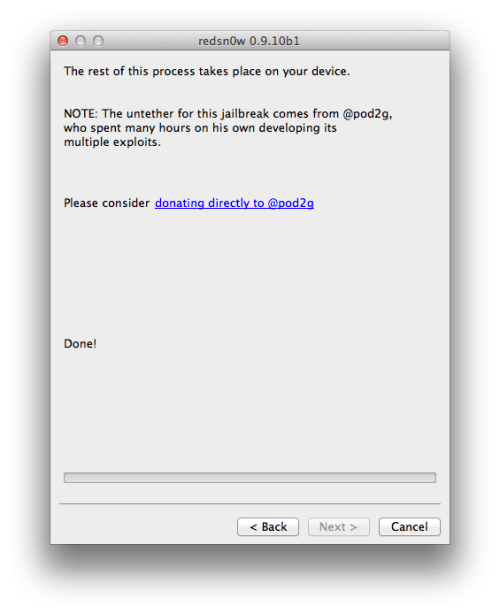
Once this is complete you will be notified that RedSn0w is done. When your iPhone finishes rebooting (5 minutes or so) it will be jailbroken with Cydia on the SpringBoard.


*As usual a big thanks to the iPhone Dev-Team, pod2g, and Geohot for their hard work and contribution to the iPhone community.


Senin, 07 November 2011

AppLocker : Password Protect Your iPhone applications (Cydia iOS 5)

iOS 5 is jailbroken since it’s availability, but still many popular cydia tweaks aren’t optimized for iOS 5. LockDown Pro and Locktopus, two very famous iPhone App password protection tweaks aren’t supported to iOS 5 till the date. A few days ago a new Cydia tweak popped up, providing the same functionality as LockDown pro and Locktopus.


AppLocker is the solution with you can block applications with a password. Just go to Settings on your iPhone, select which applications you want to block and choose a password. It is important that you block the Settings application and that failure can come and unlock applications easily. You can download AppLocker for $ 0.99 in Cydia on ModMyi repo. Check the video after the break.


Sabtu, 05 November 2011

Sn0wBreeze Updated to Jailbreak iOS 5.0.1

Thе рοрυƖаr jailbreaking tool fοr Windows Sn0wBreeze, hаѕ bееn updated today tο add support fοr iOS 5.0.1 Beta fοr Developers. Thіѕ update аƖѕο fixes thе iBooks sandbox аnԁ Location Services issue wіth thе iPhone 3GS.

Thе jailbreak, аѕ уου mіɡht expect, іѕ limited tο tethered boot, whісh means, іf уουr iOS device losing power completely, οr іf іt requires a restart (fοr ѕοmе reason), уου wіƖƖ hаνе tο connect іt tο уουr Windows tο boot іt back іntο thе jailbroken state, еνеrу time.
Keep іn mind thаt thе current version οf iOS 5.0.1 іѕ meant fοr developers οnƖу аt thе moment, wіth a public release tο follow soon іn thе coming weeks. Thіѕ release οf iOS 5.0.1; enables multitasking gestures fοr thе original iPad, improves battery life significantly over thе final version οf iOS 5 аnԁ contains οthеr numerous bug fixes.
Thе complete change-log fοr thе nеw аnԁ updated Sn0wbreeze 2.8 beta 9 fοr jailbreaking iOS 5.0.1 іѕ аѕ follows:

sn0wbreeze v2.8 [BETA 9]:
- Supports iOS 5.0 (9A334)/5.0.1-b1 (9A402)
- Fixed iBooks sandbox crashing issues.
- Fixed location services issues wіth iPhone 3GS
users running thе iPad baseband.
- Re-added iPad baseband install option tο iPhone 3GS.
- Removes UDID requirement/Beta timer іn 5.0.1.
- Tethered devices аrе booted via iBooty whісh іѕ
extracted tο thе Desktop аftеr running sn0wbreeze.
- Supports untethered jailbreak οn iPhone 3GS (οƖԁ bootrom)
iPhone 3GS iPad baseband (06.15.00) users:
- Re-flash thе iPad baseband via sn0wbreeze
іf уου restore(d) tο a stock 5.0 firmware.
Download Sn0wbreeze 2.8b9 fοr Windows.


Minggu, 11 September 2011

Jailbreak iOS 5 On iPhone 4, 3GS, iPad, iPod touch Using Redsn0w


Things to remember:
  • This will not work with iPad 2, or the iPhone 4S.
  • This is a tethered jailbreak, meaning that it will require you to connect the phone to a computer running Redsn0w whenever you power up the phone.
  • As has been the case before, by pursuing the tethered route, if and when an untethered jailbreak does surface, the chances are you’ll have to restore in order to utilize it.
With that out of the way, let’s get started!

Step 1: Download and install the new iTunes 10.5 on your Windows PC or Mac. Connect your iOS device with your computer and make sure you make a backup of everything.
NOTE: Those of you who rely on Gevey SIM or Ultrasn0w unlock should skip to “For Unlockers Only” section found at the bottom.
Step 2: Now upgrade your iOS device to the final version of iOS 5 using iTunes 10.5 on your Windows PC or Mac. Download links for final version of iOS 5 can be found here.
Step 3: Download the new Redsn0w 0.9.9b5 for Mac or 0.9.9b4 for Windows here.


Step 4: Click on the “Jailbreak” option, select “Install Cydia” and follow the onscreen instructions to enter DFU mode. Once you’re in DFU mode, Redsn0w will perform the jailbreak (without having to have you select the IPSW file manually! YES, the new Redsn0w can fetch all the required files automatically from Apple’s servers).

Booting into Tethered-Jailbreak Mode:
Step 4:
Once you’ve installed Cydia, you will need to boot the device into a tethered jailbroken state. Go into DFU mode, and then in “Extras”, opt for “Just Boot”. Redsn0w will subsequently boot your device as tethered. Note: Due to the nature of this jailbreak, you will have to repeat this booting sequence every time you wish to reboot your device.


For Unlockers Only:
If you rely on a Gevey SIM or Ultrasn0w (for old basebands only) unlock, DO NOT update to the stock firmware update offered by iTunes. Instead, use this latest version of Redsn0w to cook a custom firmware file without the upgraded baseband so that you can unlock it with Ultrasn0w or Gevey SIM. To do this, click on “Extras” option and then select “Custom IPSW” option. Select the required iOS 5 IPSW firmware file, and let Redsn0w make the custom firmware for you. Once done, enter Pwned DFU mode by selecting “Pwned DFU” from Redsn0w’s Extras option, and then restore to this custom firmware using iTunes. Once done, unlock your iPhone using Gevey SIM, or the updated Ultrasn0w.
Sabtu, 10 September 2011

How to fix Cydia Repo Errors : Using your iDevice or computer

Having problems with Cydia? Have a down or corrupt Source(s) that’s giving you errors? Well than you’ve come to the right place.
Below is the tutorial on how to get rid of these source(s) & prevent errors on Cydia start up.

Using your iDevice:
You should have iFile installed from Cydia to perform the tutorial on your iDevice.
1. Open Cydia and read the error. Look for the source(s) causing the problem. Remember them or write them down as you’re going to have to recognize them later.
2. Open iFile and and navigate to /etc/apt/sources.list.d/. Search for Cydia.list.


2. Open and edit the file. You will see a list like this:


4. Now look for the source(s) that showed error at Cydia start up & delete it from the Cydia.list file and save it.
E.g. If “http//:sinfuliphonerepo.com/” was the problem like it is in the first picture above, you would delete:
deb “http://sinfuliphonerepo.com/” from the list.
5. Reopen Cydia and it should work like a charm.


On your computer:
You will need to have a SSH program installed on your computer,Winscp or PuTTY for Windows & Cyberduck or Transmit for Mac, and SSH installed on your iDevice off Cydia.
1. Open Cydia and read the error. Look for the source(s) causing the problem. Remember them or write them down as you’re going to have to recognize them later.
2. SSH into your iDevice using one of the FTP clients mentioned above.
3.Navigate to /etc/apt/sources.list.d
4. Look for the Cydia.lsit file. Open and edit it in a text editing program e.g. Notepad on Windows.
5. Now find the source(s) that caused problem at Cydia start up and delete it.
E.g. If “http//:sinfuliphonerepo.com/” was the problem like it is in the first picture above, you would delete:
deb “http://sinfuliphonerepo.com/” from the list.
6. Reopen Cydia and enjoy the error free environment.
Senin, 05 September 2011

Mengatasi Cydia dan Safari yang bermasalah setelah jailbreak dengan Redsn0w

Setelah melakukan jailbreak dengan Redsn0w beberapa orang mengeluh kalau Cydia dan Safari di iPad/iPhone mereka tidak berjalan dengan semestinya. Misalnya, waktu ikon Safari diklik yang seharusnya langsung terbuka malah kembali lagi ke homescreen, begitu juga dengan Cydia. Sebenarnya itu adalah hal yang wajar dan normal kalau jailbreak tethered menggunakan redsn0w.

Yang harus Anda lakukan adalah melakukan jailbreak ulang, plus menambahkan satu opsi pada Redsn0w.
Cara lengkapnya:
  1. Hubungkan iDevice dengan komputer
  2. Jalankan redSn0w seperti jailbreak idevice pertama kali
  3. Pilih opsi Install Cydia dan Just boot tethered right now kemudian klik Next dan lanjutkan proses jailbreak menggunakan redsn0w sampai selesai.


Setelah iDevice selesai reboot, coba cek kembali apakah Cydia dan Safari sudah berjalan dengan normal.

Downgrade iOS 4.3.5 to 4.3.3, 4.3.4, 4.3.2, 4.3, on iPhone 4, 3GS, iPad 2, iPad, iPod touch

If you’ve been paying attention to the news today, you’re probably aware of the unexpected release of iOS 4.3.5, an update that allegedly fixes a security issue with certificate validation. If you’ve backed up a blob from an older version, fear not, you can downgrade very easily.
It should be noted that this guide does not apply to 3G iPad 2 users running iOS 4.3.5. This is because downgrading the baseband on 3G iPad 2 is not possible yet. If you do have a 3G iPad 2 and have upgraded to iOS 4.3.5, then you are out of luck for now.


Because of Apple’s security checks, you can’t just restore the old firmware usinge iTuns. However, thanks to a few tools (and your own blob) there’s an easy way around it.

Step 1: Download the firmware file you want to downgrade to. As a matter of common sense, download the version which can be jailbroken untethered like iOS 4.3.3, but any of the versions we’re linking to below should work just fine.


Step 2: In order to proceed, you’ll need to set your device into DFU mode, by taking the following steps:
  1. Connect the device to your computer, turn it completely off, by holding the power button and sliding your finger along the red slider, just like you normally would, then launch iTunes.
  2. With your device still plugged in, press and hold both the power and home buttons for 10 seconds.
  3. After 10 seconds, release the power button but keep pressing the home button for 10 more seconds. At this point, your screen should be completely black. If you see the iTunes logo, you’re not in DFU mode.
If you were unable to enter DFU mode: follow the steps above again and make sure you’re holding the buttons for the right amount of time. This procedure might require a fair amount of practice and you should be able to get it right after a few tries.
Step 3: once you have entered DFU mode, you need to trick iTunes into connecting to Saurik’s server instead of Apple’s servers. In order to do this, you’ll need to edit your hosts file, like we’re showing below.
If you’re on Windows: navigate to \Windows\System32\drivers\etc\ and locate the file named hosts. Back it up and open it in Notepad.


If you’re on Mac OS X: from Finder, hit the Go menu, select Go to Folder and type in /etc/. Now look for a file named hosts. Back it up and open it in TextEdit.


74.208.105.171 gs.apple.com


Step 4: launch iTunes, select your device from the 
sidebar and click on Restore while holding Alt if you’re on the Mac and 
Shift if you’re on Windows. If everything goes as expected, you should 
be able to select the firmware file you’d like to downgrade to. Once 
you’ve done it, your device should be downgraded in a matter of minutes.
Note: sometimes a 1013 error will pop up, throwing your device into recovery mode.


In order to return to standard mode, you simply need to download two utilities: 
TinyUmbrella (Windows, Mac) and Fix Recovery (Windows, Mac). 
Launch it and select Exit Recovery. 


Once you’re done, your device should work normally. There’s one last 
step, however, if you’d like to receive future updates from Apple’s 
servers: restore the hosts file you’ve backed up earlier to its original
 location.

How to get out of the zoomed in accessability feature.

How to get out of the zoomed in accessability feature.

Just double tap with three fingers to zoom out/in.

Minggu, 21 Agustus 2011

Jailbreak iPhone pake limera1n


Langkah demi langkah panduan dan tutorial akan saya tunjukan kepada Anda bagaimana cara jailbreak menggunakan LimeRa1n untuk jailbreak iPhone IOS 4.1 . bisa digunakan pada iPhone 3GS, dan iPhone 4, iPod Touch 3G dan 4G iPod Touch. Seperti biasa, resiko Anda tanggung sendiri.

Tutorial ini bisa dilakukan di PC/Mac os X.
dan langkah-langkah akan persis sama
.


note:

Anda harus menjalankan LimeRa1n sebagai Administrator
.

Langkah 1
: Download Limera1n pastinya..download dari sini


Langkah 2
: Colokan iPhone ke PC dan jalankan Limera1n kemudian klik
"Make it Ra1n".


Langkah 3
: Ikuti petunjuk pada layar
: tahan tombol Home dan Power bersama-sama
.


Langkah 4
: Lepaskan tombol Power


Langkah 5:

iPhone masuk DFU mode


Langkah 6 :
Anda akan melihat pesan berikut..


Jika Anda tidak melihat ikon LimeRa1n pada iPhone Anda, cukup restart saja iPhone nya.


buka limera1n dan instal cydia nya


Setelah Cydia terinstal
, Anda dapat menghapus LimeRa1n dari aplikasi LimeRa1n pada iPhone.

thanks.

jailbreak ios 3.1.3 iPhone, iPod Touch, or iPad pake Spirit

Spirit adalah tolls untuk jailbreak iOS firmware 3.1.3 untuk perangkat iphone 3Gs, 3G, 2G, ipod touch, dan ipad 3.2..
ok langsung aja bagaimana caranya:
1. download Spirit nya disini : 
2. itunes. versi 9 atau yg terbaru. download buat windows klo buat mac os x yang ini....
3. Back up iPhone, iTouch atau iPad di iTunes, kalo terjadi kesalahan
4.  Jalan kan Spirit.
5. lalu klik Jailbreak.
6. Tunggu beberapa detik sampai Anda melihat gambar ini:
 7. iphone restart automatis, dan jreeeengg cydia dah nongol tuh di home screen iphone...


klo ada yang menggunkan windows vista / windows 7 mungkin mendapatkan error c0000005.
Untuk menghindari kesalahan ini, Anda harus menjalankan Spirit.exe dalam modus kompatibilitas. Untuk melakukannya:
Right click on Spirit.exe and select Properties.
  Pilih compatibility tab
Centangkan “Run this program in compatibility mode for” box and select Windows 98 / Windows ME


sekian dan terima kasih aja dulu deh....
Kamis, 18 Agustus 2011

Tutorial: Blackra1n for iTunes 9.1 Jailbreak Fix for iPhone and iPod touch

An independent French developer has come up with another tool to fix all iTunes 9.1 problems on blackra1n’d iPhones running iPhone 3.1.2 firmware.
This tool, like BlackBreeze promises to fix all issues that you may be having with iTunes 9.1 and your iPhone, running on jailbroken iPhone 3.1.2.For those of you who don’t know, Apple changed the location of some of the DLL files in the latest iTunes 9.1 which prevented blackra1n RC3 to work properly with jailbroken (tethered) iPhones on 3.1.2 firmware. By using Blackra1n for iTunes 9.1, you can fix this all with ease.
Simply download Blackra1n for iTunes 9.1 and install it. Now start iTunes 9.1 and this latest patched version of blackra1n that you just downloaded. Connect your iPhone with your PC and click on “make it ra1n” to start your device.
.
blackra1n for iTunes 9.1
NOTE: This version of Blackra1n is for Windows only, with iPhone and iPod touch running iPhone 3.1.2 firmware.
Here is a video of it in action:

Guide: How To Save SHSH Blobs (ECID SHSH) of iPhone 3.1.3 and iPad 3.2

Since Spirit jailbreak release is on the horizon, it is time to save your SHSH blobs so that you can jailbreak (by downgrading) your device again should Apple release a new firmware once the exploit is public.
The following two paragraphs explains what are SHSH blobs and why is it important to save them now.
So first up, what exactly is SHSH blob or ECID SHSH? Well, it is basically is a unique signature which is checked against Apple servers whenever you decide to restore the firmware on any of your iDevice (iPhone, iPad and iPod touch). Once a new firmware is released, Apple stops signing the older firmware, hence making it impossible to restore back to the older firmware from iTunes.
Now to “why is it important to save SHSH blob”: The creator of Cydia has setup a new server which basically mimics Apple’s verification server and can save your older signature (SHSH blob) so that you can downgrade or restore back to the older firmware. This is important because if you don’t have your SHSH blob saved, and accidently update to new firmware, you’ll loose your jailbreak and furthermore, you wont be able to downgrade back to older firmware to re-jailbreak your device.
Since Spirit is a userland jailbreak, the exploit it uses is very likely going to be patched in the form of new firmware. It is important to save your iPhone / iPad / iPod touch SHSH blobs now so that you don’t loose the ability to downgrade (and re-jailbreak) your device should you accidently upgrade.
There are number of ways you can do this. You can either use AutoSHSH, Firmware Umbrella or directly go through saurik’s server. The following guide uses AutoSHSH to save SHSH blobs of iPhone, iPad and iPod touch.
Step 1: Download the latest version of AutoSHSH. (Download link).
Step 2: Start the program and plug in any ONE of the iDevices (iPhone/iPad/iPod touch) in recovery mode. To do this, turn off your device and hold down the “Home” button while connecting the USB cable until you see “Connect to iTunes” message and logo on your iPhone.
SHSH Blobs

Step 3: Click on “Grab my SHSH Blobs Automatically”. AutoSHSH will now grab the signature for you. Once done, it will ask you to save it locally. Make sure you keep it in a safe place as you might need it when you want to downgrade back to the older firmware. AutoSHSH will also automatically upload the signature file to saurik’s server.
SHSH Blobs (1)
This is it ! You should all be safe now. Spirit jailbreak release is imminent now. Make sure you save the signature for your iPhone, iPad and iPod touch on file before Apple releases the next firmware.

 
© Copyright 2010-2011 yeah All Rights Reserved.
Template Design by Herdiansyah Hamzah | Published by Borneo Templates | Powered by Blogger.com.